Saturday 31 March 2012

OWOP - Days 5, 6 and 7

Second half of my week in One Week, One Pattern outfits, and a couple of lessons learned.

Day 5 (daytime): Still sewing lace in the studio...


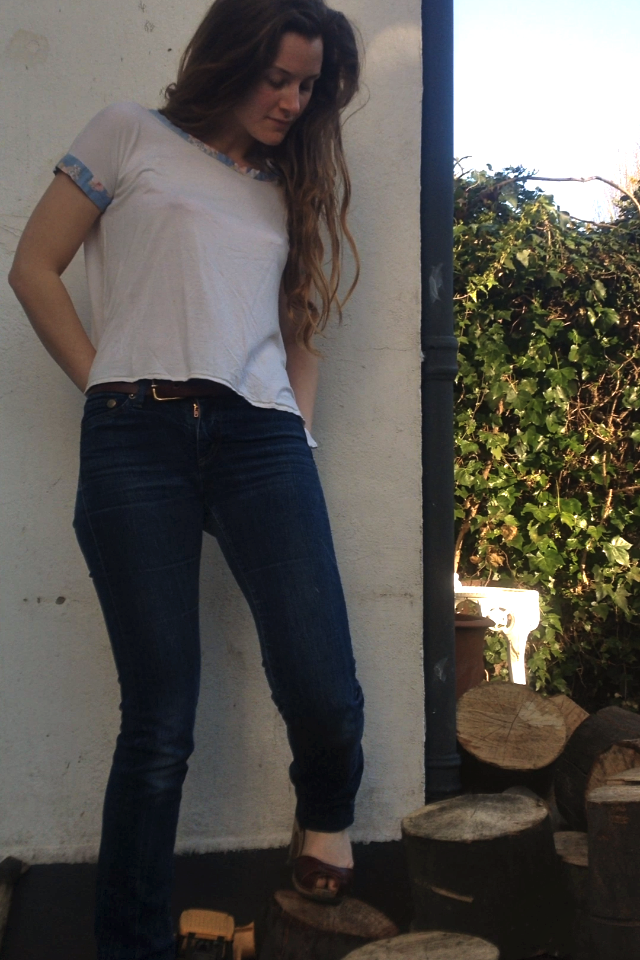
I wore: Blue cotton shirting swing top, Del Forte jeans.  This is my least favourite of the swing tops, having never been worn since I made it last summer.  There's obviously a reason Dixie recommends only using a knit fabric for this pattern (armholes a little tight as the woven cotton has no stretch) and although I like the floral binding on the neck and cuffs, the blue striped cotton shirting makes me feel like a nurse (not the hot kind!).  Having said all that, I actually enjoyed wearing it more than I thought I would: it was comfortable enough and I liked the alternative-to-a-shirt feel of it.  I reckon I probably would repeat this make in a woven fabric -remembering to make the armholes a little bigger- to wear as a smart shirt-type top.

~

Day 5 (evening): A night of Motown classics with The Temptations, The Four Tops and The Crystals live at the o2 Arena baby!!


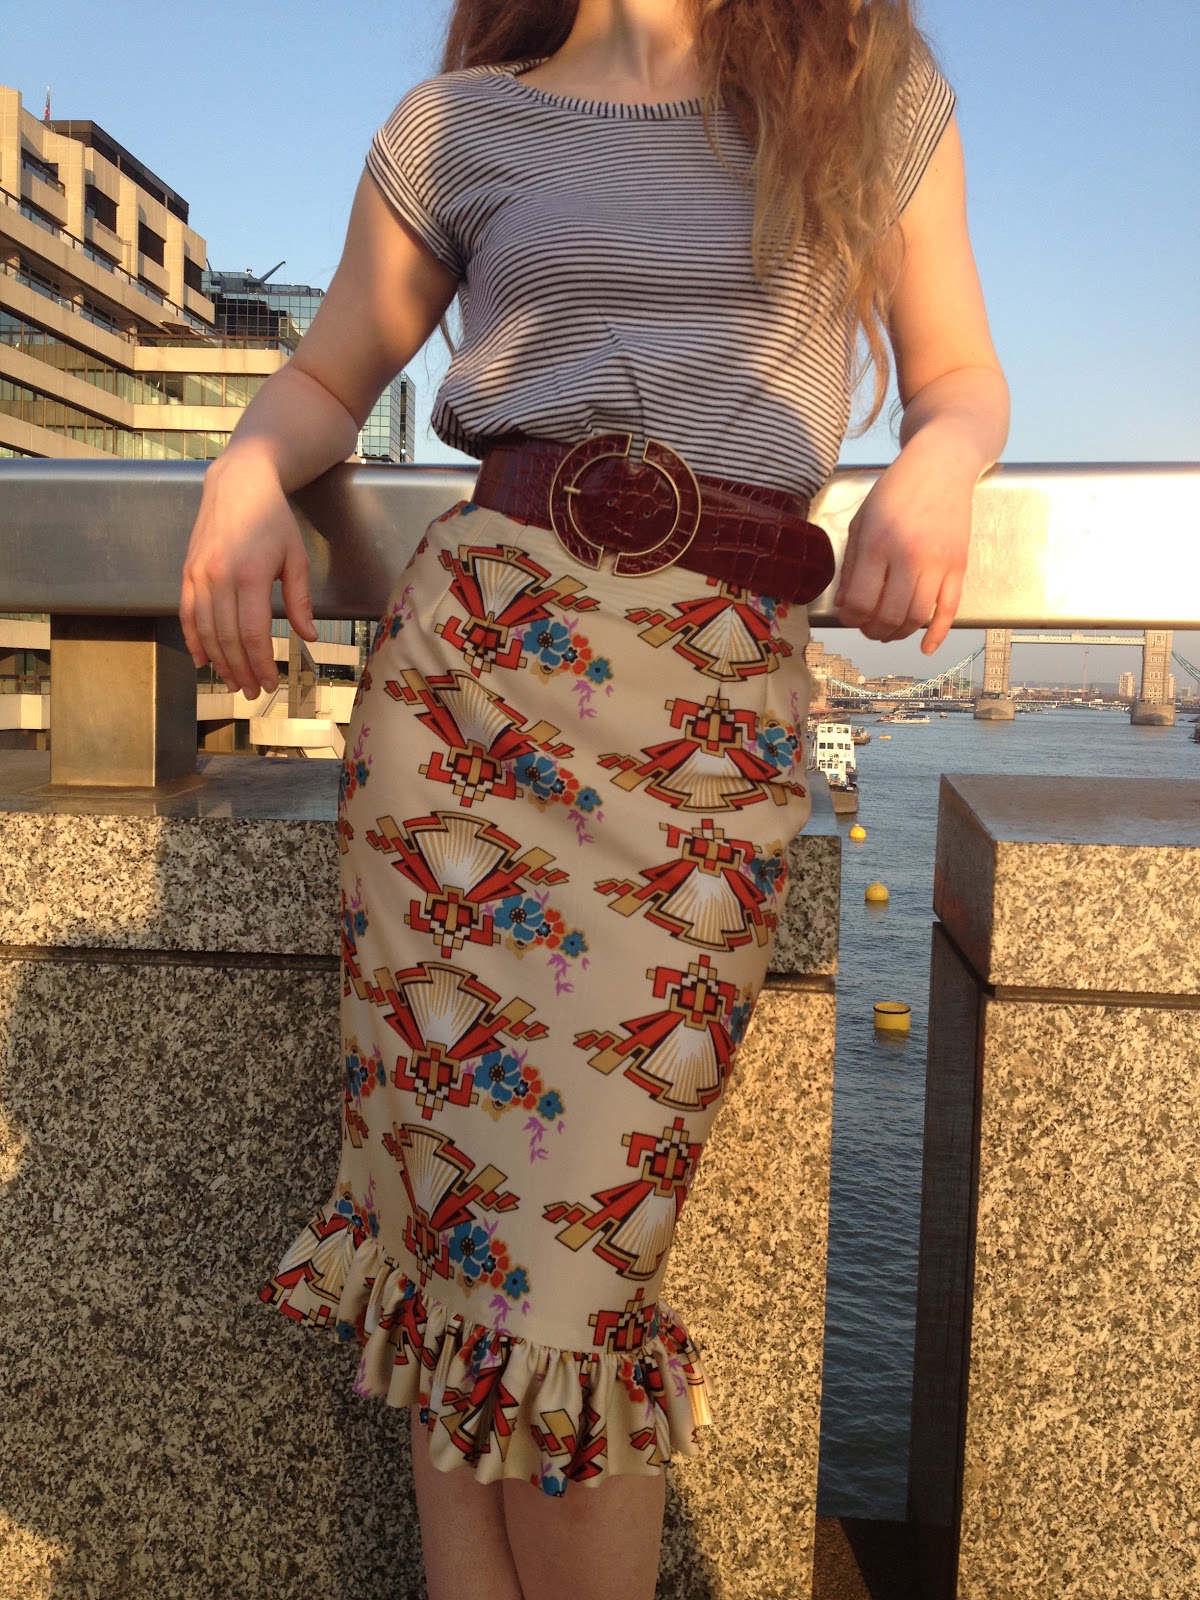
I wore: Possibly the best outfit I could have put together for such a wonderful night of retro soul!  Stripy swing top, Kung Fu Fighting wiggle skirt, Reiss belt, Agent Provocateur red pompom mules.  Favourite OWOP outfit so far.

~

Day 6: Hungover.  SIGNIFICANTLY hungover.  It seems sake, vodka and white rum do not mix well.  Comfort a must today.  


I wore: White viscose jersey swing top with red rose Liberty cotton binding, Uniqlo tartan men's trousers, vintage Budweiser belt, Puma sneakers.  When it comes to dressing down, this is my favourite type of outfit.  Reminds me of being a grungy teenager listening to The Smashing Pumpkins.

~

Day 7: Last day of OWOP!  Just as I started this week with the first swing top I'd made, so I ended with the most recent.


I wore: Dusty pink wool jersey swing top, houndstooth pencil skirt - the first of my McCalls's 5081 collection (I feel like I've been discussing this pattern almost as much as the swing top during this OWOP challenge having worn three versions of it this week... Double OWOP cred for me?), French Sole flats.  This is a look I'm really digging.  Typically a late 1950s maternity style, but I think that the elegance of the pencil skirt, softened by the swing top and worn with a simple pair of flats is just perfectly cute and easy, even for my busy day to day life.

One thing that this challenge has brought to my attention is that I'm clearly really into pencil skirts these days!  I began with my one swing top pattern, which given the amount I've made (six) and the incredible versatility of the pattern, was very easy to wear every day for a week.  But as a result of all this thoughtful outfit planning, I've ended up also wearing three of my four McCall's pencil skirts.  What's surprising about this is how easy they are to wear!  I'd always shunned my wiggle skirts by day thinking them far too impractical, saving them only for stylish evening occasions.  But it turns out that wiggle skirts during the day are actually fine, even for running around after a little boy, working in the studio and general errand-running.  

They just make all those things feel that little bit more glamourous.

Thank you Tilly for organising OWOP!  I for one, really enjoy the solidarity that comes with group challenges like this; now who's looking forward to Me-Made-May-'12??


Friday 30 March 2012

Forgive me, if mine own horn I doth toot...


...but totally smitten am I with my new skirt!


Yet another variation of my trusty McCall's 5081 pencil skirt pattern, this baby was whipped up in just a couple of hours after I was practically smacked in the face by a flash of inspiration and an uncontrollable desire to own a fishtail frill wiggle skirt made from this sickeningly fabulous printed nylon I picked up in Walthamstow.

Construction wise, I shaved a couple of inches off each side to create a more closely fitted, wigglier silhouette and omitted the tail pleat (??) so that adding the gathered frill would be neater.  The frill itself is simply a long length (almost 2m) folded over and gathered at the top where the raw edges meet.  With hindsight, I probably should have gathered the frill using elastic then sewed it to the hem with a zigzag stitch so as to allow for a bit of stretch... As it is now, there is no give whatsoever in the hem and one does have to significantly reduce ones stride almost to a pigeon step, resulting in a slightly exaggerated bottom wiggle of a walk.  I guess that's why they call it a wiggle skirt.


For some reason, the print and texture of this fabric reminds me of Carl Douglas' Kung Fu Fighting... Which I've now had stuck in my head for three days.

Wednesday 28 March 2012

OWOP - Days 1, 2, 3 and 4 (and a 6th Swing Top)

This last week here in London could not have given us days more beautiful to really make the most out of Tilly's One Week, One Pattern challenge.  My chosen pattern is Dixie DIY's Swing Top, which I have now made a grand total of six times.

Day 1: A super sunny Saturday in a somewhat Seventies outfit, hosting a little garden party to welcome in British Summertime. 


I wore: Stripy jersey swing top (first one ever made), Del Forte jeans, vintage Wonder Woman belt, Swedish Hasbeens clogs, Stella McCartney shades.

~

Day 2: Out and about in London, a deceptively chilly sunny day, so I was glad for my sixth and latest swing top made from a cosy ribbed wool jersey.


I wore: Dusty pink wool jersey swing top, Monkee Genes, Marc Jacobs flats.

~

Day 3: Monday in my studio, sun streaming in through the shutters, surrounded by Chantilly lace, Dupion silk and ivory organza... Hoping to infuse a wedding dress with dreams and ideals of love and companionship, health and happiness.


I wore: White viscose jersey swing top with blue floral cotton binding, Del Forte jeans, belt my Dad made for me, Swedish Hasbeens clogs.

~

Day 4: Early breakfast in Portobello with my StepDad, then back to the studio and the final fitting of the wedding dress with my Bride and her Mum (can you tell how much I'm itching to be able to talk about this in more detail??!).


I wore: Grey marl viscose jersey swing top with red paisley rayon binding, red crepe pencil skirt (made from McCall's 5081, which is fast becoming a contender for the next OWOP challenge...), Marc Jacobs flats.

So far I have been really enjoying this challenge; the swing tops already feature heavily in my day to day dressing, so I can't really call that aspect challenging, but what I have enjoyed most is the outfit planning and styling around one staple item.  This top is genius in its versatility; easy and comfortable enough to be dressed down for everyday running around, yet pretty and polished enough to tuck into one hell of a wiggle skirt and sequin heels for a look that will unite Carrie Bradshaw and Joan Holloway in fashion matrimony... Intrigued?  Stay tuned for OWOP Day 5's evening outfit...

Friday 23 March 2012

OWOP - Count me in!


Tomorrow marks the official start date of Tilly's latest One Week One Pattern challenge, which will see sewists from around the globe wear the pieces they have made from one single pattern, every day for a week.  In Tilly's own words:

"It's about celebrating those sewing patterns that we love so much we use them again and again. Many of us have a special sewing pattern that is so wearable, practical, versatile, beautiful or for whatever reason it never gets time to gather dust on the shelf before we whip it out again. Personally I'm really interested to find out what other people's favourite patterns are. Plus the exercise may get us to reflect on how much we use the patterns in our stash, or what factors make a well-used pattern.


It's also an exercise in restyling what's essentially one style garment (or it may literally only be one garment that you've made), pushing the boundaries of its versatility by creating seven outfit variations out of it. Who needs more clothes when you can remix the ones you've already got?"


I had been on the fence as to whether or not to take part; I have a handful of patterns I have made 3-4 times, namely this pencil skirt, the Sorbetto tops, this 70s dress... But nothing that I could realistically wear every day for a week that would fit in with my life.  Pencil skirts too fancy (and restrictive!), Sorbetto's too summery, and 70s dresses too impractical.  So I had initially decided to opt out of the challenge... when I suddenly remembered my vast and ever expanding collection of swing tops, all made from Dixie DIY's great (and free!) pattern.  


So far I have made five of these tops, and I already wear them all the time.  This pattern is an absolute breeze to make up, and the resulting top is comfortable, flattering and versatile.  Which I think is really the aim of this exercise: identifying and celebrating the patterns which produce clothes that not only complement our lifestyles but make us want to make and wear them over and over again. 

In preparation for this challenge, and in anticipation of Britain's famously unpredictable climate, I am now going to quickly whip up a sixth swing top, this time in a dusty pink ribbed wool jersey.  Just in case it gets a bit chilly.

Monday 19 March 2012

A Spot of Light Springtime Baking? Not When You Eat the Entire Batch!


Of the many, many delectable looking recipes I have been accumulating on Pinterest these days, there was no more than a five minute lag time between pinning this and preheating the oven to make a batch of SophistiMom's Chewy Lemon Snowdrops.

Despite being egg and dairy-free (I replaced the butter stated in the recipe for a non-dairy olive oil spread), light and lemony, small and shareable... they were moreish to a fault and I pretty much ate the entire batch.  Which is most definitely not light nor acceptable really, especially with Easter just around the corner!  Never mind, I'll just be sure sure to do an extra ten minutes on the hula hoop tonight.

Saturday 17 March 2012

Minoru and Me

I actually finished this jacket over a week ago, but I've just been too busy wearing it every single day that I haven't gotten around to writing it up.


And I think it might just be my favourite jacket I own.  


Red cotton twill, tartan brushed cotton lining, no hood but added side seam pockets... This jacket could not be more perfect for Spring if it tried.  In fact, for me this is a jacket that pretty much oozes perfection all round: light but still cosy, casual but still elegant (so in love am I with the gathered waistline at back!), supercool oversized collar (I took Lladybird's advice and interlined the collar for added hold-its-shape-ability), colour that goes with just about everything I own (I'm actually starting to notice a red theme in the vast majority of things I make these days... maybe time to reach out to the rest of the spectrum), and just the fact that I've worn it every day since I finished it speaks for itself, I reckon.


The pattern itself was an absolute joy to sew with.  I followed Tasia's sew-along, and thank God I did.  Parts of the instructions hadn't been so clear to me, so reading through the sew-along posts not only clarified my doubts, but also forced me to slow down my sewing.  As a result, I have the most professionally finished piece of clothing I have ever made.  This has been something of a revelation to me, as I do have a tendency to speed through my makes, cutting corners (ssssshhhhhh!), and sometimes ending up with pieces that to me are pretty flawed.  I have recently seen a vast improvement in my own skills, and this jacket is the cherry on top.  So, from now on... improved skills + perfectionist finishing = clothes that even I, my own worst critic, can't find fault with.  Clothes that I wear so proudly and joyfully, chiming aloud, "why, thank you, I made it myself!", without needing to worry if they'll notice the untidy lining or the machine stitched hem or the blatant lack of fusible interfacing.


(Confession: I've never even been in the presence of, let alone implemented the use of, fusible interfacing... I just ignore that part.  I don't know why it scares me so.)


So in conclusion, this jacket, and my first time sewing a Sewaholic pattern, has been a mega success.  Revelations have been had, compliments aplenty have been paid.  Now I'm thinking about the Renfrew... and a certain variation on it I'm itching to try!

Wednesday 7 March 2012

Tutorial ~ Easy Peasy Pleated Miniskirt


So for a moment there it actually looked like Spring... Never mind, armed with my sewing machine and some Hawaiian-style surfer print cotton, it still can be.  At least until it really is.  So grab yourself a couple of metres of fabric that makes you happy*, stick on the following playlist, and let me quickly show you how to make this supercute pleated miniskirt.


You will need:

2m fabric
1m ribbon for the waist fastening (cut in half)
invisible zipper (approx 6 inches long)
sewing machine with matching thread
measuring tape
pins
scissors

Start with the waistband.  Cut a rectangle of fabric that measures about 6 inches deep (double the depth it will be once folded plus seam allowance) by your own waist measurement in inches,  plus 1 inch on each side seam allowance (generous allowance I know, but better to add extra so you can let some out if you need to!).  This waistband will be meeting at centre back (like this one), not overlapping, so no fannying around with hooks and eyes or buttonholes, we'll just be sewing some ribbon into the seam to make for a pretty bow tied in back.

Fold your rectangle in half lengthwise, wrong sides together, and press.  Then open it up and, right side facing you, place your lengths of ribbon at each end, aligned with the fold.
    Fold over again, this time right sides together sandwiching the ribbon, and stitch those short ends with a 1 inch seam allowance.  Turn right side out and double check that it still fits your waist before trimming seam allowance!


    Now we need to make three little notches along the raw edge that will correspond to three little notches on the fabric for the skirt to make sure the pleats are evenly spaced.  Do this by folding the waistband in half, snip a notch at the fold (centre), then fold in half again and snip that fold (quarters).

    At this point you'll need to decide which side of your waistband is the outside and which is the inside.  The fabric I used for the waist had some grass print so obviously I went for the side where the grass was right way up.  Now press the notched edges inwards, with the inside of the waistband slightly deeper than the outside - this is so that when you come to edge stitch the waistband to the skirt, you'll be sure that the needle will go through all the layers.

    The skirt!  Cut a big rectangle approximately double the width of your waistband (or wider if you want more pouff) and however long you want your skirt to be, adding at least three inches for seam and hem allowances.  Always better to cut longer and shorten than to cut too short.  Press the side edges in by half an inch.


    Make three notches along the top in the same manner as for the waistband.

    Open up your waistband so you can see the notches and match up the central notches on the band and skirt.


    Pin the skirt to the inside of the waistband where the notches correspond.

    Arrange the pleats evenly between the notches and securely pin into place.


    When you're happy with the arrangement, fold the top of the waistband over and pin close to the fold.  When you turn your skirt to the wrong side, make sure that the pins are also holding the inside folded edge of the waistband also.

    Time to insert the invisible zipper... For some reason, despite having sewn countless invisible zippers, I always find it a daunting task.  Then I do it, remember how easy it is and feel a bit silly.  Either way I'm not going to try to walk you through it myself... I'll hand you over to the professionals at the Coletterie for a proper tutorial instead!  One word of advice though: make sure you lower the setting on your iron if you want to avoid melting/curling up your zip... Like I did...

    silly me...
    much better

    Now you can edge stitch the waistband to the skirt!  Stitch with the right side facing you keeping your stitches as neat as possible and close to the fold.


    Seeing as you pressed the waistband so the inside fold would come down a little lower, all three layers should have been caught as you edge stitched the outside.

    All that's left to do is the hemming!  Make sure you try on the skirt first so you can be sure to mark the length you want.  Then press the hem in twice and stitch.


    Done!  


    *Preferably a lightweight woven fabric like cotton, but would look equally cute in jersey too - although I'd only recommend that to sewers with a little experience sewing with knits.  Non-stretch fabrics are much easier to work with if this is your first attempt!

    Sunday 4 March 2012

    Recipe Revealed ~ The Most Delicious Dairy-Free Chocolate Cupcakes I've Ever Eaten

    So I promised you the recipe for my insanely deliciously dense chocolate cupcakes (no dairy!)... Here it is. Get ready.


    ~ Chocolate Cupcakes (dairy-free) ~

    50g self-raising flour
    50g ground almonds
    30g cocoa powder
    140g golden caster sugar
    a pinch of salt
    1 egg
    200ml coconut milk (half a can)
    1/2 tsp vanilla essence

    For the frosting:


    or

    300g icing sugar, sifted
    100g dairy-free spread/goats butter
    40g cocoa powder, sifted
    40ml rice milk


    Preheat oven to 180 degrees.  Line a cupcake tray and set aside.
    In a bowl, sift together all dry ingredients and mix well.
    In another bowl, combine wet ingredients.
    Slowly add wet bowl to dry bowl and mix well until fully incorporated.
    Spoon mixture into the cupcake cases and bake for 15-20 mins (I like mine to have a bit of a gooey fondant-esque centre so I take them out after 15 mins.  If you like yours well done, bake for 20 mins, or until a skewer inserted comes out clean).


    A few words on frosting:  Dairy-free frosting can be tricky.  If you are substituting butter for a dairy-free alternative (which tend to have more of a soft margarine-like consistency) it can be much harder to achieve a firm frosting that keeps its shape once piped.  Make sure you refrigerate the frosting for a good hour or two before attempting to pipe, or alternatively, simply slather it on, Hummingbird Bakery style.  If you're using goats butter, the consistency will be fine, as if you were using regular butter, but watch out for a very subtle goaty kick!  I personally don't mind this, and if you're the kind of person who likes cream cheese frosting, you probably won't even notice.  Another option for frosting, my current favourite in fact, has a whipped coconut milk base (see above link for recipe).  You'll need to have a bit of foresight for this though as the opened, unshaken can of coconut milk needs to be in the fridge overnight to get sufficiently firm.  No impromptu cupcake baking with this method I'm afraid.


    So there you have it my friends.  My secret recipe is out.  Spread the love.  Sharing is caring.  And above all, enjoy!


    Saturday 3 March 2012

    Catching Up

    Can it really be March already?  Almost a quarter into 2012 - already??  Wow.  Time certainly does fly when you're having fun // deliriously scheming new business schemes // working on a million projects at once.  In fact, I think I spent most of February trying not to spread myself too thin.  Looking back, or rather, flicking through the pages of my Filofax to recap, I can see that, despite not having much in the way of finished pieces to show for it, I actually did do a whole lot over the last four weeks: scheming sessions and meetings aplenty, kiddy parties and half term activities galore, three trips out of London... all with a constant undertone of knitting needles clicking and sewing machines whirring.

    So, in the interest of taking myself a step back from everything I've got going on to take stock (fighting my way out of a sea of to-do lists and UFO's), I have compiled a(nother) list of what's going on...

    ...In my studio

    • Minoru Jacket.  Having made an excellent start at the beginning of Tasia's Sew-Along, I then slightly put it to one side for a couple of weeks whilst prioritising other projects with actual deadlines.  But I had a little studio springclean the other day (inspired by Joanne's sewing room transformation) and instantly felt myself overwhelmed with renewed inspiration and got stuck straight back in.  It's amazing what two evenings' work can achieve - all I have left to do is stitch the lining wrists, gather the waist and sew the hem!  And I couldn't be more thrilled with how it's turning out.  I'm using a post-box red cotton twill, a supersoft brushed cotton tartan for the main lining and a slippery silver poly to line the sleeves.  I've omitted the hood but added side-seam pockets.
    • Surf Skirt.  When I saw this fabric on a recent trip to Goldhawk Road (important: join the petition to save the legendary Goldhawk Road fabric shops from demolition here!), I immediately imagined making an entire new Summer wardrobe using this cotton.  I guess it's probably a little silly to spend an entire season in surf print... So I'll start with a pleated miniskirt, which I thought I may as well put together as a tutorial... Watch this space.  And get down to Classic Textiles on Goldhawk Road to get in on the surf skirt action!
    • Still working on the Quilt, and a real life Wedding Dress for a friend (which, for obvious reasons, I won't be able to post any progress pictures of until after the wedding!).

    ...On my needles

    • Pickles' Close Cables Sweater.  Man, this has been on the go since October!  Which is insane - the yarn is so chunky and the needles so humungous it should have been doable in a week.  But it's proving a bit of a nightmare to handle - the needles are too huge and the yarn too irregular.  I've spent the last couple of years pretty much exclusively knitting chunky... But after this I don't think I'll want to see anything a needle fatter than 8mm for a while!
    • The Wonderful Wallaby.  This cult classic of a knitting pattern has been a regular feature on my to-make lists for months, and now that I'm free of the chunky yarn spell, I have finally cast on for the Willie Wallaby (size 4 - which already looks like it'll be too small for my three-and-a-half year old!) using a khaki green wool/alpaca blend and what feels like a very spindly 4mm circular needle!
    • The beginnings of a cropped jumper I'm making up as I go along.  In my mind, this will be the perfect top to my Surf Skirt...

    ...In my kitchen

    • I have barely been able to contain my excitement as Spring has truly sprung in the last week!  So it seemed only fitting to bake a little welcome offering in the form of this Rosewater Angel's Food Cake (recipe same as my Lavender Angel's Food Cake, just substituting the lavender water for rosewater).  
    • Sticky toffee pudding... Promising myself this will be the last caramel sodden cake I bake until Winter comes around again.  Damn, was this a good one.
    • Yet another batch of my infamous dairy-free chocolate cupcakes for a kiddy party.  I don't think I should keep this recipe to myself much longer... something this good needs to be shared!  Recipe coming soon - in the meantime, be sure to stock up on coconut milk and ground almonds...


    Sigh... weight lifted, mind de-cluttered and consolidated.  Onwards and upwards.
    Related Posts Plugin for WordPress, Blogger...
    Related Posts Plugin for WordPress, Blogger...